ROAD WAVE Elite ASSEMBLY AND INSTALLATION
READ INSTRUCTIONS BEFORE INSTALLING
MAINTENANCE MANUAL
What’s in the Box:
- 10 feet Pex Tubing – Tee’s into the RV’s water line
- Pigtail Hose – Connects the Pump to the Hose Reel
- Gun and Lance – Two Piece Gun and Lance
- 50 feet service hose – Black, Pro-Flex High Pressure Water Hose
- Hose Reel – Box within the main box w/ Hose Reel
- Pump and Motor – Box within the main box w/ Pump and Motor
- Soap Injection Tube
- Attached 35 foot GFI Power Cord
- Bag of Hardware and Fittings
- Pex Elbows (3), Pex T-Connector, Pex Shutoff Valve
- Bolts, flat washers, lock washers
- Screws with lock nuts and washers
- Brass 90 degree Elbow, Brass Straight Connector
- Galvanized 90 degree Elbow
Tools you will need:
- 12″ Crescent Wrench
- 7/8″ Box end Wrench
- 13/16″ Box end Wrench
- 3/4″ Box end Wrench
- 17mm Box end Wrench
- 1/2″ Box end Wrench
- 3/8″ Box end Wrench
- 1/2″ Socket and Ratchet
- Roll Teflon Plumbers Tape
Step 1: Where to Mount The Road Wave:
Determine where The Road Wave unit will be installed.
Our recommendation, for safety, is on the passenger or curb side of the motor
home mid-way through the coach. Easy access to a cold water pressurized line and
120V – 15amp outlet supplied by the generator is also most desirable for
installation. The coach configuration and customer input will determine the most
desirable location for The Road Wave.
Step 2: Mounting the Hose Reel:
Determine orientation of the Hose Reel ; Side mount, Front mount, or Custom mount.
Determine if the Hose Reel can be mounted on top of the pump and motor frame or if it has to be mounted separate from the pump and motor frame. If the standard top mount is selected, determine which direction the service hose will be pulled toward you and ensure the handle is accessible to reel up the hose. The Side mount is most common and takes less space.
Step 3: Assembling The Road Wave:
1. Install the reel to pump and motor frame with the 4 bolts, washers, and lock washers provided using 1/2″ wrench and 1/2″ socket.
Make sure the hose reel is mounted in the direction you determined above in Step 2: Mounting the Hose Reel
2. Attach the Handle to the Hose Reel using Phillips head screws with washers and locking nuts with 3/8″ wrench. Hand tighten all three screws before tightening all screws firmly.
3. Attach 90 degree silver elbow after removing thread protector and applying Teflon tape. Tighten with 7/8″ wrench. Align so the 90 degree elbow is facing through the hole in the Hose Reel. You can always change the direction if not right when attaching the hose.
4. Install hose onto Reel. Using Teflon Tape on both ends of the hose. Leave elastic ties on the hose keeping hose intact until you have the hose connected to the hose reel. The smaller of the two ends attaches to the hose reel. Tighten by hand rotating the hose while threading into the silver elbow. Tighten firmly with 17mm Wrench. Remove the elastic ties and wind the hose onto the hose reel.
5. Attach the Gun to the other end of the hose reel using Teflon tape on the threads. Tighten firmly with 3/4″ and 11/16″ wrench. Connect Lance to Gun, hand tighten.
6. Attach the Pigtail hose to the hose reel using a brass fitting. The hose reel orientation will determine whether the straight or 90 degree brass elbow will be used. Side Mount will use the 90 degree, Front mount will use the straight connector. Tighten firmly with 3/4″ wrench and Teflon tape on both the hose reel nipple and the Pigtail connector. Wrap the Pigtail around the Frame to take up extra length of Pigtail hose, firmly hand tighten to the pump.
7. Attach the soap injector tube to plastic connector on the pump. Push on firmly, remove plastic connector on pump if necessary. Use Velcro tie to attach tubing to frame for easy release.
8. IMPORTANT: Install the Dip Stick for the oil. Remove shipping plug and insert dip stick. Check oil level using dipstick. The Road Wave is shipped with a full oil reservoir however if you need to refill the oil use SAE 30W conventional oil.
Congratulations, you have just completed the assembly of The Road Wave Pressure Washer System. Because of the Quality, Convenience, and Safety you will use your Road Wave on a regular basis for years to come.
Anytime! Anywhere!
For additional questions or help with assembly or installation visit www.TheRoadWave.com/FAQ or call (406) 549-9283.
Step 4: Installing The Road Wave into your Coach:
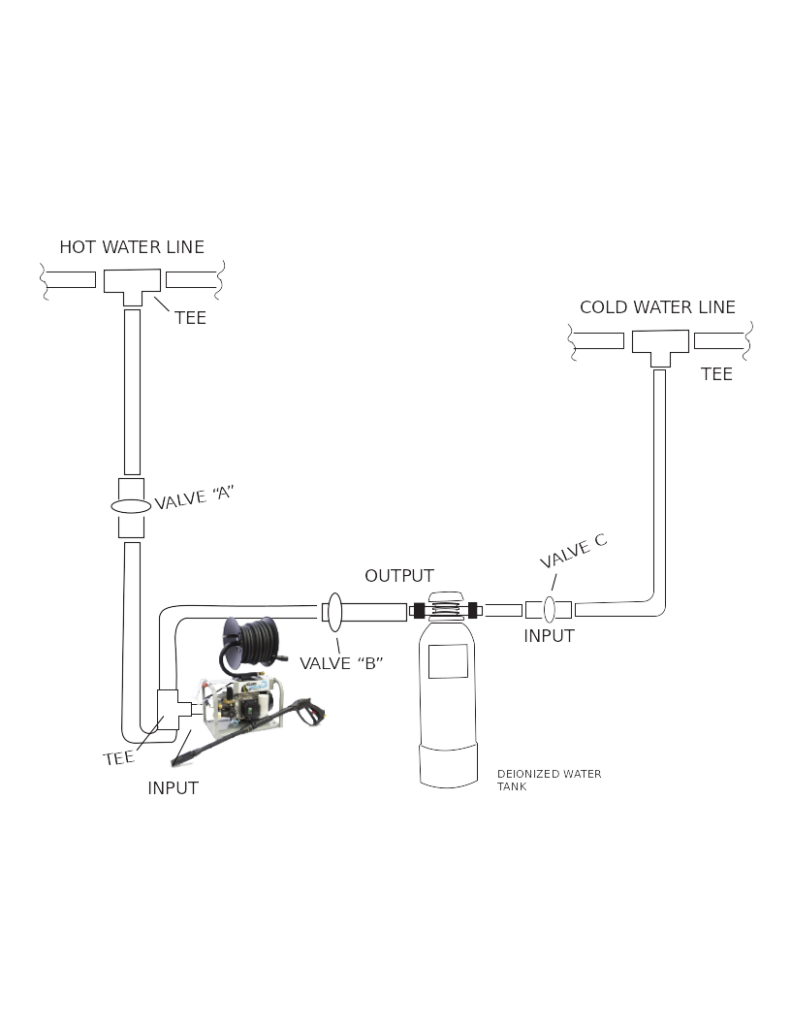
Diagram

-
Choose the location of the system to be installed. On a motorized RV we recommend a bay on the door side of the coach.
-
Locate both hot and cold water lines. When choosing a hot water line on a coach with Hydronic Heating make sure to use a line that’s after the Mixing Valve.
-
Turn off all supply of water (pump & city water), open all low point drains.
-
Install bracket for DI Tank and lock in Tank. Remove rubber feet from Pressure Washer and use lag screws to secure Pressure Washer in place.
-
Using Pex Cutter, cut 1/2” Pex and insert Tee connectors into both water lines.
-
Attach the Pex fresh water connector to the input connector of the Road Wave pump.
-
Cut a 1 1/2” section of Pex and push firmly into the fresh water connector. Next attach a Tee connector onto the Pex section. This is the point that both hot and cold water lines will terminate.
-
Finish running both hot and cold lines with valves in place as shown in diagram. Note: valves A & B should be installed in a location that is easy to reach as they will be used often.
-
After all plumbing lines are installed, check connections. Turn the units water pump on and pressure up the system. Check for leaks.
-
Open valve A and close valve B. Power up the Road Wave, run for 2 minutes. Valve A and open valves B & C, run for 2 minutes. No leaks, install is complete.
Winterizing the unit:
As you pump antifreeze through your RV, open The Road Wave Shutoff value and turn on the unit, let the RV antifreeze flow through the hose and out the end of the Gun and lance.
After 15 seconds of spraying the gun you should see a slight change in color. We recommend that you have a white piece of paper that you can test on and see that it is pink.
